Wednesday, September 14, 2016

In the Art Room: Sub Plans that aren't subpar

Despite the fact that it was nearly 20 years ago, my first year of art teacherin' is burned into my brain. I can see the inside of the trailer that was my first art room when I close my eyes (they referred to it as a "portable" but, y'all. I lived in a trailer. I know what the look like, okay?). Back in those days, when you needed a sub, you just scrawled some chicken scratch lesson plans onto a sheet of paper (uh...still do that, not even gonna lie), called somebody mid-run to the toilet and accessed the damage the following day. Oh, would you look at that, all my markers have been de-capped and left to dry out on the floor. Another day in post-subday paradise.

Thankfully, times have changed (uh, except for those chicken scratch notes). These days, I leave pre-recorded notes for my sub. The idea behind this is two-fold: MRS. STEPHENS IS WATCHING...ALWAYS WATCHING. And the kids keep on creating! Imagine that, no more "read a book, draw a picture" but fur realz, bonafide lesson plans. That educate! And allow the kids to create! All while you are either praying to the porcelain princess or on that dream cruise, I'm not gonna judge. 

So, in this here post, I thought I'd share with y'all my favorite pre-recorded sub plans that have worked swimmingly in my art room. Feel free to use, y'all! And enjoy that "sick" day...wink-wink, nudge-nudge.
Are y'all familiar with Kelsey Montague? In an effort to introduce my students to contemporary artists as well as the street art movement, I wanted them to "meet" Kelsey. Her murals tie in so nicely with our kindness theme this year as they are titled "What Lifts You". I have this dream of my students creating several street murals throughout our school and this one they will start without me. I'll be sure to share the end result soon...but in the meantime, it makes for a super simple and fun sub plan!
This fun lesson was a quickie as I was only out for a pinch. But it kept the kids creating, using those elements of art and making adorable Love Monsters!
Just because you aren't there doesn't mean the masterpiece making can't go on! Last winter I had to miss several days of school due to jury duty. Thankfully, the show went on and the kids created the pieces to this beauty
By the way, you might be wondering just exactly how I get these videos to my sub. I've gone about it a couple of ways. I've used ClipGrab to save videos from my YouTube to my computer and left my computer for the sub. I've also sent my videos to myself via GoogleDrive or Dropbox. This works if you know you are going to be absent. However, if it is unexpected then having videos saved onto your computer, with supplies prepared, is your best bet.
Jury duty is no foolin, y'all. And just like most grown up stuff, it can take lot of time away from what you enjoy. Creating these sub plans for the kids made the whole experience less painful.
Everybody is a Star was such a fun sub plan! Going to the NAEA convention was a thrill for me...and knowing that the kids were still creating marvelous masterpieces for our art show really gave me peace of mind. 
I even think this lesson that I kicked off the school year with would make a fabulous sub lesson! You can find the blog post here and the finished mural here

So! Take that day of rest and be rest assured that your kiddos are still creating. Feel free to use these videos and lessons in your art room. Would love to hear your fabulous sub plans, friends! Tell me all about 'em in the comments.
 photo signature_zpsd10b3273.png


Tuesday, September 13, 2016

Art Teacherin' 101: Episode 18

Not even gonna lie to you: no matter how "prepared" I am, I spend most of my plan time running around like a crazy person prepping supplies, setting up the room, getting videos cued up or visuals displayed. I call it the Art Teacherin' Hustle. And most of the time, my hustle is spent SEARCHING for stuff. From my luke warm coffee to my half eaten Lara bar to the Sharpie markers or the funky monkey scissors, the hustle is strong with this one, y'all. But NOT for grade level examples and visuals. Nope. I always know where that stuff is, thanks to today's Art Teacherin' 101 tip:
How's that for easy? I'm a firm believer in Keep It Simple, Stupid cuz I'm pretty heavy on the stupid. But, you gotta admit, keeping up with all of this art biz is tough! I'm currently digging myself out of all things Dot Day and putting them up on the walls...(or, in the case of the very first photo, putting them around necks. My students also made Dot Day shrink plastic necklaces!)
 In case you missed these snaps over on my Instagram, here is just a sprinkling of all the projects (and project examples) that I attempt to keep up with using my lil system. By the way, you can find this lesson with video here
I've always wanted to do this extension project with printing plates. More on this process later this week. I love when a project lends it self to more fun lessons!
 By the way, my second graders framed out their texture relief pieces with some painted cardboard pizza rounds. I did notice that their texture pieces were looking a little lackluster. So I had them brush a thin coat of ModPodge over them and I'm super happy with how much they pop now.
And this third grade lesson can be found here

I swear one of these days I'm gonna get FUR REALZ organized...but until then, I'll keep offering y'all my super simple tips. Have a great week, kids!
 photo signature_zpsd10b3273.png

Sunday, September 11, 2016

In the Art Room: Clean Up, the Movie!

 
Hey, guys, Box o' Crayons here! I'm so excited to share with y'all a little something I've been referring to as Clean Up, The Movie. It has been brought to my attention that my wee artists have kinda forgotten our clean up routine (cuz their art teacher foolishly assumed that they'd remember it as we were only out of school for two months and they are under the age of 10 [I know, I know. When will I learn]). Because I covered it quickly at the start of the year, I failed to really drive home the important parts of our routine. So I recruited my awesome buddies Kiera Crite, our music teacher, Ali Starkweather, our P.E. teacher and Bethany Kokoski, our P.E. teacher, to help a crazy art teacher out. 

Grab your popcorn, folks! And enjoy Clean Up, The Movie
I got the idea to create the movie earlier this week, wrote out the "script" (if that's what you wanna call it...been over-sharing all the deets here) Thursday night and we filmed on Friday after school. I strongly encouraged the ladies to do a little improv because they are so funny, I knew they would come up with some great stuff. And I know that the kids are going to LOVE seeing some of their favorite teachers ham it up in this video! Be sure to watch to the end where I threw in our outrageous outtakes.
Here's what I decided to cover in the art room:

* Clean Up Signal I once casually mentioned that I thought it would be cool to have a gong in my art room after seeing one at a music shop. My hubs works for a musical instrument company and, well, I magically received one for our 10 year wedding anniversary. The kids love the Clean Up Gong (tho it has been accidentally referred to as the Clean Up Bong and the Clean Up Dong...oh boy). Before I had the gong, I used this chime from my husbands company. I love using this inexpensive chime as an attention getter. 

* How to Clean Up Essentially, the kids need to know that they are to make the room as tidy as they found it (or better!). My older students totally get it, they are actually really great at straightening and tidying up. I have noticed that my younger kids don't even seem to see that they left scissors out or their chair not pushed in. I don't know if it's because they are young and mama picks up after them or what. But the words, "I am not your mama!" may have come outta my mouth a time or two.

* Standing like a Statue Their signal to me that they are ready to roll is that they are standing silently behind their pushed in chair at a tidy table. To encourage them to work together and clean up, the "best" table gets to line up first. Which is really bogus as they all have their certain spots in line. 

* Alphabetical Order Okay, you might think this one is crazy but it's the best thing ever. My students either leave my room and go to P.E. or vice versa as they have P.E. every day at my school. For our total Special Area sanity, we have the kids line up in designated spots so we don't have to deal with "But I'm the Line Leader!" "I'm the Door Holder!" "I'm the Caboose!" We ain't got time for that. Our fabulous P.E. teachers teach them how to line up in alphabetical order so when they come to me, they already know their spot!
* Painting Clean Up I must get asked a bazillion times, "where do I put my painting?" My response is usually "really?!" Or, even better, when they bring the painting to ME and I'm all, "do I look like a drying rack?" I totally forgot to put in the video where to put the paint brushes but the kids are really good at remembering where to put those (in a large plastic coffee can filled with warm soapy water by the sink). 
Weren't the actors hilarious?! We were DYING in between takes, y'all. I'm so lucky I work with folks who are willing to join me in my crazy ideas. BIG THANK YOU, Kiera, Ali and Bethany! I can't wait for our next movie making adventure. 
In case y'all are interested in how I created and edited the video (and did the voice over on the prezi), you might want to watch the above video. I'm SUPER low-tech...so if I can do it, you can!
While the making of the movie didn't take us long, the editing was a bit of a beast. Splicing all of those clips, trimming them down, creating the Prezi at the end and doing that voice over...it was a labor of love. I think I'll be able to use it for several classes and years. And I can always edit it some more in iMovie if needed. 
I'll keep you posted on the kids' reaction to Clean Up, The Movie!
 photo signature_zpsd10b3273.png

Thursday, September 8, 2016

In the Art Room: Dot Day Radial Designs by 3rd Grade

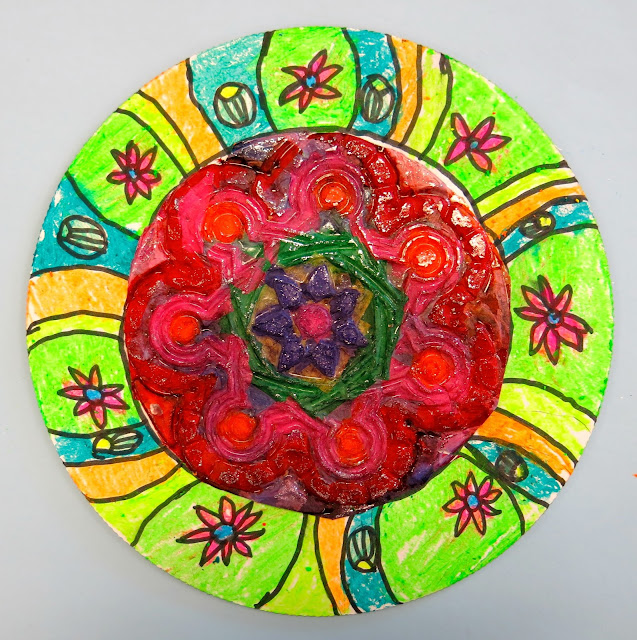
Hey, kids! Today I'm sharing with you the follow up to a lesson I shared a coupla weeks ago: Tissue Paper Relief. Because of the delicate nature of these tissue paper reliefs, I knew the kids would need to back them on something. So, after a review of radial balance and design, as well as the elements of art, we created these colorful backgrounds, added our tissue creations to them and, viola! Third grade successfully created their dot designs for Dot Day!  
Aren't they so spectacularly colorful? I swear they practically glow in the dark! In case you missed it, here is the video I created to introduce the kids to radial balance and design as well as the process of making the tissue reliefs:
BIG SHOUT OUT to AOE and Blick for sharing this lesson at the most recent online conference. 
Surprisingly, this project was a quick one. We spent one day creating our tissue reliefs which needed a day (or more) to completely dry before popping out.
Once dry, I popped the designs out as they are pretty delicate and I didn't want the kids to accidentally tear them. The following art class, they were given 10" cardboard rounds. They traced their tissue relief in pencil and then created a radial design in black marker.
I reminded them to keep their designs big because they would be coloring with these bad boys:
So I'm a sucker for all things fluorescent. And so are the kids. I love these Gallery brand oil pastels which you can find in most of your art supply catalogs and Amazon. 
Creating and coloring the design took them just under an hour. Enough time to attach our tissue reliefs to the center and have them ready for a display in the hall! 
What I love about this project is that it reinforced our study of radial balance...
Gave us the chance to work with a variety of art supplies...
And create something really cool! Definitely a project I see myself teaching again in the future. 
I'm not usually a repeat offender when it comes to art projects but for this one, I might have to make an exception.
I know several of you purchased the rubbing plates after hearing about it from AOE. I'd love to see where you take this project!
Until then, have a super bright week, y'all! 

 photo signature_zpsd10b3273.png

Tuesday, September 6, 2016

In the Art Room: A Fiber-tastic Twitter Chat!

Hey, favorite friends! I'm super stoked to share with y'all that I'll be hosting a Twitter chat tomorrow in conjunction with the Wisconsin Art Education Association. If you've never joined the fun of a Twitter chat, here are a couple of things you should know:

*  To join the chat, simply search #wiartchat in the search bar. Starting at 8pm, you'll see the chatter starting with questions by me about all things fiber. 

* To add to the conversation, begin your tweet with the hashtag and an A for answer the number of the question you are responding to. For example, "#wiartchat A1: Yes, fiber arts is in my curriculum!" 

* Know your abbreviations. Because of the limited amount of characters, folks will often respond with abbreviations which can be a little confusing. Just think of it like reading a text and the shortened words will make sense. 

* Hold on to your seats: these chats are often only 30 minutes in length. With a half dozen questions and a bunch of folks responding, it can get VERY busy. My first time joining in on a chat involved me just taking it all in. Relax and enjoy the ride.

Now, let's talk about what all the tweeting will entail:
I'll be resharing the questions during the chat so no need to put them to memory. I hope to chat with y'all tomorrow night, it will be so fun!

Of course, I'm thrilled to be chatting with my buddies in Wisconsin as I'll be there for their fall conference leading a fiber class and talking it up in LaCrosse on October 20th - 21st. You can find out more details and register to attend here
 And, since we are talking all things fiber-tastic...
Just a reminder that I'm teaching a fibers course over on AOE. Remember, if you use the code SAVE10CASSIEART17, you'll get a 10% discount!
So looking forward to chatting with all y'all real soon! 

 photo signature_zpsd10b3273.png