Hi, friends! My students are wrapping up one of the clay projects they created and I thought I'd share. Last year, my first through fourth created clay mugs and it was easily everyone's favorite clay project. When I shared that we were working with clay again, a few weeks ago, their first question was "are we making mugs again?!" I had already planned on it...so they were excited to hear the answer. Once mugs are complete, we celebrate by drinking hot chocolate out of them...so it's a whole lot of fun.
This year, I created a video to share with them. Because I have 30 minute art classes, I only showed the pinch pot portion and a bit of coil making for the first class. The second class, we did a brief coil making reminder and then watched the portion about creating a handle. The video helped them trouble shoot and get their mugs completed in just two 30 minute classes!
This week, we started glazing! They were told they could use any two colors of glaze, one for the inside and one for the outside. They were to do at least three coats of their chosen colors and not to glaze the bottom. Once complete, they could join me at the splatter glaze station!
When my students were finished glazing, they could help a friend or work on the large banners I created to announce our upcoming art show!
We used Prang's Creativity Street Tempera Sticks to color these with.
The glaze we used are from two companies and I like them both: Mayco's Stroke and Coat and Amaco's Teacher's Palette. Both are food safe and fire to cone 06.
When introducing clay to your students, you might find this video fun to share:
Howdy, partners in art teacherin' crime! Today I thought I would share the video I created for The Art of Education's online conference last year. This will give you an idea of what their conferences are like if you've never been (read: they're super fun!). My presentation was all about clay projects for the kiln-less. BONUS: you can STILL do all of these projects even if you have a kiln...with some mild modifications to some.
In the video, you'll see just a snippet of some of the ideas from the book. My favorite air dry clays to use are Crayola's Air Dry (I'm not wild about Model Magic but their air dry is good) but my favorite is Amaco's Air Dry clay. I also love Sculpey and Fimo for polymer clay. Making clay is super fun...in the video and in the book, I'll walk you through some recipes.
Now, if that clay video doesn't get you excited to share clay with your kiddos than just do a lil search on my blog. I have A TON of clay videos both here and on my YouTube channel so be sure and check 'em out!
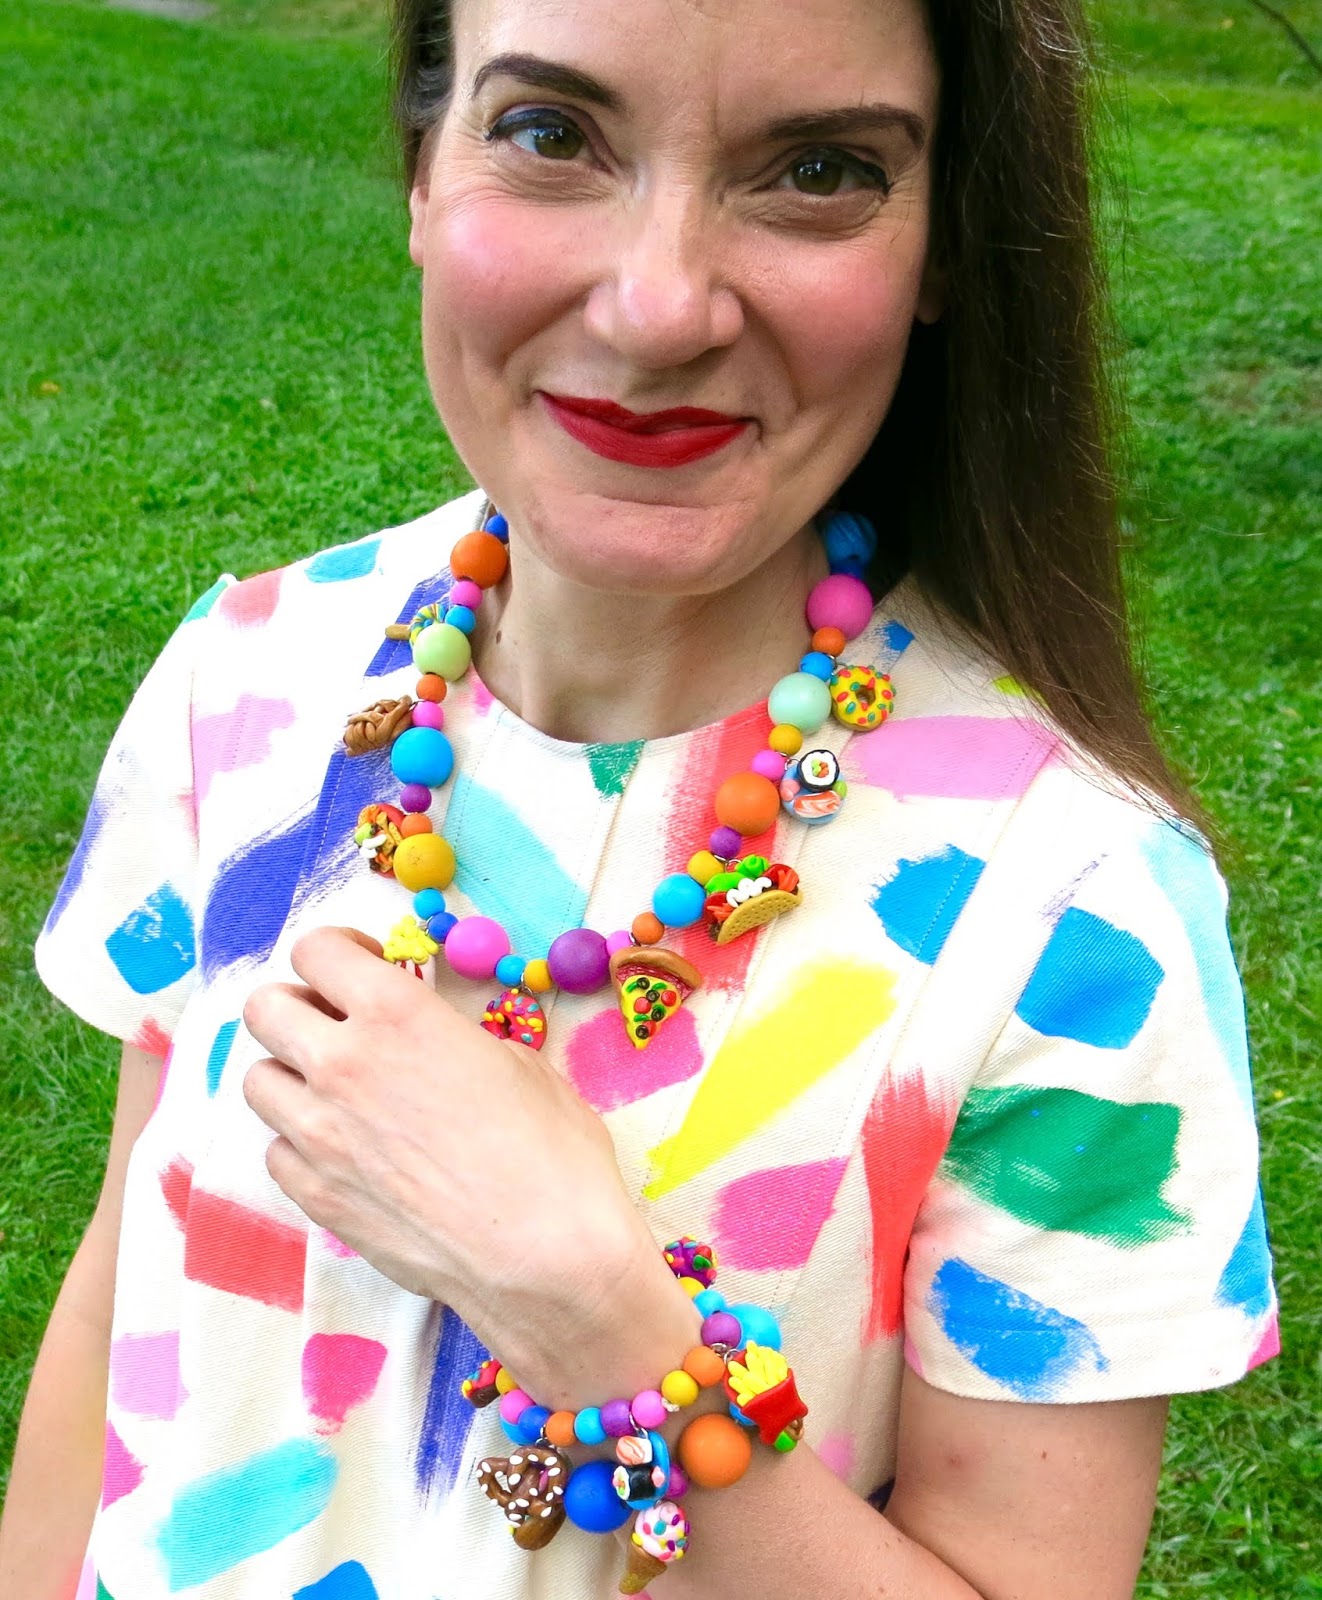
As you might have guessed from my last post, I'm on a bit of a polymer clay bender. I have this habit of going thru phases when working with different art supplies. When I'm needle felting, I needle felt EVERYTHING; when I'm painting the walls of my art room, NOTHING IS SAFE; and when I decide to make miniature snack foods out of clay, watch out!
I've got sushi, pie, popcorn, cupcakes, donuts, pizza, tacos, nachos, pretzels, lollies, pancakes, ice cream, bacon -n- eggs and more! I have to blame some of this on my friends over on Instagram who gave me a TON of ideas for what to sculpt. So many that I ended up with enough charms for not one necklace but also two charm bracelets!
I hope this helps!
Because the grand majority of clothing in my closet is just as busy as this necklace, I decided to pair it with the dress I painted and stitched. Yes, this would be one of the more tame pieces of clothing in my closet. Surprised? I didn't think so.
Wanna make some snack food charms of your own? You totally should! I even made a video tutorial showcasing how to make the tacos, nachos, donuts and sushi! Once you conquer those, you can take on all the snack foods. Here's a little list of supplies:
* Sculptey Clay...or whatever your polymer clay of choice might be. I like the big ole 24 pack of the clay for a wide range of colors. Be sure and use all of the craft store coupons you can find as this stuff ain't cheap. * Jump Rings...that's the little metal circles you'll want to add to your clay piece before popping it in the oven. I just slide mind in the back of the clay, sinking them about half way in. You'll be adding two jump rings per creation...but you'll only need to add one before baking. The other one can be added once the clay is cooled and easier to handle. * Jeweler's Tools...or pliers. You'll need small tools to pry the second jump ring open and add it to the one that is already on the clay. Each charm will need TWO jump rings. If you only use one, then your charms will hang sideways. With the addition of the second one, your charm will hang straight on and be visible to all of your admirers. * Elastic...I use elastic string for my necklaces as I truly hate creating jewelry and working with tiny findings and jump rings. So being able to slide my necklace over my big ole head Candy Necklace style works best for me. * Modpodge...I used that to seal and protect my charms once they were out of the oven and cooled. * Wooden Beads...You can find a variety of wooden beads in the wood department (heh-heh) of your local craft store. I use acrylic paint to add color to mine.
My favorite part of making this necklace was making the charms...obviously. I made so many! I still want to make more. But do I really need ANOTHER snack food jewelry item? Probably.
Some tips about polymer clay: it's weird. Sometimes it can sit out forever and never harden and other times, it becomes like a rock.
They sell a kind of polymer clay softener at the craft store for exactly one million dollars (but seriously, it's ridiculously pricey for the size of the bottle). OR you could simply add just a drop of baby oil to the hardened clay, rework and TA-DA! You are back in business.
Another tidbit: I used to sort and store my clay by color in styrofoam bowls and/or thin plastic containers. When I went back to reuse the clay, it had eaten holes right thru the styrofoam! I shared that on my IG and most folks said they had success keeping their clay in plastic bags or thicker plastic containers. I now store mine in a wooden drawer with dividers. WHO CAN EAT THRU STYROFOAM?! I mean, that stuff isn't even biodegradable!
My students LOVE making food items out of clay. In fact, one of our art shows was a 1950's diner where all of the food was sculpted from clay. I think they would so love making these tiny foods...they have tiny hands, they could handle it, right? (okay, MAYBE on a slightly larger scale!)
You can also find a ton of clay food times in my kid's clay book! Shameless plug, over and out.
By the way, is it one MILLION TRILLION degrees where you are? I went outside to snap these photos and was dripping sweat within the first three minutes. Summer in Tennessee is no joke, y'all.
I need to hit my sewing room and start up on my Back to School ensembles but I so wanna make more charms. I made art supply shoe clips out of this clay a couple years ago but now I think I need a art supply charm necklace too. Oh boy. The polymer clay creatin' journey continues!
Welcome to the 3-Dimensional display of the Johnson Elementary Art Show! Our annual art show showcases all of the artwork that each of our young artists create throughout the school year. In this blog post, I'll be sharing all of the 3-D work that was displayed in my room...but stay tuned! A post about the incredible 2-D display is up next. This art show is a HUGE undertaking as we share all of the efforts of every student. An art show like this would not be possible without the help of some truly AMAZING moms that spend more hours than you could imagine making the art show a memorable one for our artists. I cannot thank them enough...y'all are truly incredible! All of the projects you'll see here are ones that were created by my students while viewing the how-to videos I created for them. I'll be adding those videos for you here. Feel free to use them in your art room! I'll be adding more videos like these over the summer so you might want to subscribe to stay tuned. But enough about that, let's take a tour of the Johnson Elementary Art Show 2017, 3-D Displays!
I hope you liked the tour. If you have any questions, feel free to leave them in the comments!
This project was a hit with the kids...and one that my current third graders are asking if they will get to do next year. I had several kiddos sewing at home and bringing in the pillows and monsters they had created there. It was so fun to teach them this life skill. Here is the video they viewed:
Their creativity really blew me away. By the way, if you teach a fourth grader how to make a pom-pom, it can be a dangerous thing.
By the way, y'all know that big bunned monster is my #lifegoals, right?!
This display is one of my faves. It showcased the sculptural work of my kindergarten, second and third grade students. My kindergarten kids created the monarch butterflies:
That was a one-day project that the kids really enjoyed.
My P.E. buddy Ali Starkweather painted the rainforest backdrop that you see. Isn't it amazing? It went so well with the theme of our exotic birds and reptiles!
Let's talk about these clay projects. The third graders created these clay chameleons which were one of my faves.
We used a combo of Mayco's Stroke and Coat glazes and their Jungle Gems for a speckled look.
I really stressed a three coat minimum for glazing and I think that's why the kids were so successful in having such beautifully glazed pieces. They take so much pride in their clay work that I usually don't have to ask them to redo...they are dedicated to making them awesome!
Also on display were these birds. Y'all, these were the comedic hit at the show, they are so fun and funny. They really came to life when the kids painted them and added the feathers and beads. Here is the video lesson:
A couple of my kindergarten classes had extra days with clay so we made a second clay project: these turtles! Their other project was hung in the hallway, I'll be sure to share that with you in the following blog post.
Those turtles were super fun to create...I loved seeing the glaze effects on the texture.
The first graders created the most incredible fish so they needed a sweet display to show them off. The kids created the painted bubble paper hat covered the tables.
For these, the fish were glazed but the bases were painted with metallic watercolor. Here's the lesson video:
My second graders had just completed their ceiling tile project and had traced templates for that project. I had 65 templates...so, instead of throwing them away, I had the kids paint them as their last project.
We hung them above the first grade fish! Here's the video used for the ceiling tile project:
These might be my favorite ceiling tiles to date!
For the fourth grade bobble heads, these were displayed on my counter. I covered my cabinets with white paper and works of art by both kindergarten and second grade.
Um, that one has a top hat, a bowtie and a monocle. Perfection. Video here:
This is another project I think my younger kids are gonna wanna create. These were so fun!
Sandra Silberzweig is a favorite artist of mine...and my students.
On another set of tables covered in pink, my fourth graders had their plaster candy hearts on display.
Also featured on the pink paper were the plaster candies that my third graders created...they really looked good enough to eat!
Puffy paint for the win, y'all.
The days following the art show, I invite the classroom teachers to bring their students during my planning time. Together, we teachers work in an assembly line wrapping clay projects, stuffing them into the bags and stapling the labels on top while the kids wait on the floor. It usually takes about 7 minutes to get a class done. The kids then take their 3-D work home safely.
Stay tuned for the what's up next: a post and video of our 2-D work...until then, here's a tour of last year's 3-D display, enjoy!
Well, y'all, I gotta tell ya. It's been a long, exhausting but super fun and exhilarating week. Which can only mean one thing: Clay Week! I started doing a week of clay for the entire school a coupla years ago and now that we have it all down pat, we ain't never going back. The only thing I plan to change for next year: do two separate clay weeks, one in the fall and one in the spring. The kids love clay so stinkin' much that I want to give them more opportunities to explore! I spent this past weekend filming clay demo videos that I've been sharing with each of my classes. I did this for a couple of reasons: 1. it's so hard to demo clay and insure that each child can see. 2. I don't forget any of the details or get distracted by raised hands, talker-outers or whatever randomness that causes me to get off track and 3. the kids pay so much more attention to Television Stephens than Fur Realzies Stephens (which I take offense to but whateves). I've not added these videos to my YouTube channel yet because I'm too tired, y'all! Instead I thought I'd share with you my favorite clay lessons (with links to each lesson!) of all timez. IN OTHER NEWS (by the way, if you know me even for a second, you know that "in other news" is my fave segue to totes off-topic-town), I've been keeping secrets from y'all. It's time I let the big ole cat outta the bag: I've been working with Quarry Books...and I'm writing a book! That's right! AND it's all about...clay! So...in case you noticed that the DIY's on this here blog have pretty much dried up to nothing that's because my weekends have been spent working on el book-o. I've been keeping it kinda on the down low because I didn't want to get too excited lest Quarry find out what a crazy I am and back outta the deal. But it would appear that they are in it to win it and so am I. I'll keep y'all posted...but I just had to share. AND NOW, back to my fave clay projects!
When it comes to Clay Week, I do love to have a theme. This helps with the teaching as I can reference the same visuals. It also helps when we put together the art show as there is a real cohesiveness to it all. The clay display is always in my art room. It looks so nice to see all of these thematic projects together! One of my favorite lessons for an Asian theme were these Painted Indian Elephants inspired by my art teacherin' buddy Debbie Flynt. Each one was so colorful and unique!
Another hit, especially with the kids, were these Chinese Dragons by my third grade students! So much creativity and imagination went into each and every one that this was def a kid fave.
Pandas are so stinkin' cute. We've taken to watching Animal Planet's Panda Cam in my art room (along with puppy, kitten and otter cam...y'all, it's seriously the best thing ever). My fourth graders had a blast making these Pandas with Personality for our Asian theme.
Because our art show is in the spring, I settled upon spring with an emphasis on Monet's Waterlilies one year! My fourth graders created these frogs with so much spunk and personality that they really were a true reflection of the young artist!
Kindergarteners are a freakin' joy to do clay with as they absolutely love every minute of it! While we were working today, I heard so much laughter, happiness and discovery that it just made my day. We created these textured butterfly wallhangings to go along with our spring theme.
Opening my kiln to these pretties, I remember letting out a squeal! They were so colorful and spring-like and the third grade had a blast making them.
My favorite projects are the ones where the kids just go bananas with little details and creativity. That's what my second graders did with these cute and fun waterlilies.
One year, our theme was animals because we "sold" our creations back to our parents (for a donation) which we turned over to a no-kill humane society. This was a fun experience for the kids to see the power of being kind and art! My kindergarten and first graders created these sweet Pinch Pot Pets.
My second graders used two pinch pots to create their own version of Pinch Pot(s) Pets! I love all the variety of ideas in this lesson.
My fourth graders created these fun cat and dog sculptures. I love to encourage silliness and imagination in their works so that they really explore making a simple idea like a cat or dog their own. Again, this was a hit with kids and parents!
Second grade created these tigers one year that double as a container. There's a pinch pot on the back of each tiger that was flipped upright to be used as a bowl! Our mascot is the tiger so this was a great tie-in with school pride as well as keeping with our animal-loving theme.
And now for a batch of randoms. These fish were not tied to a theme but super cute. I love that clay can be a great vehicle in teaching texture. Such was really emphasized in this textured fish lesson for first grade!
Wall hangings can be a fun alternative to sculpture when working with clay. It's often difficult for the young kids like kindergarten town to create standing sculptures. So, with a focus on texture, my wee ones last year created these textured birds! This blog post has a how to video if you are interested.
This is one of my tried and true favorite lessons that I used to do every year with second grade until I grew tired of it and moved on. I brought it back for an after school group last year and they loved their textured initial wall hanging!
What are some of your fave clay lessons? I am SO EXCITED about our clay theme this year and cannot wait to share it with you...it's gonna be the best one yet!