
 |
| After weeks of working on this collage landscape, this little first grade dude is ready to take his hot air balloon for a ride. Over Paris, France, no less. |
Hey there, artsy folk! Look who's launched their hot air balloons -- my fantastic first grade artists! This project has been so much fun but the icing on the cake were the giggles and squeals of laughter the kids let out when they finally saw their little likeness in the balloon. It was a lengthy project (as all of mine are, sigh) but well worth the wait.
 |
| A hallway of hot air. |
We began this project right after our world-mural self-portrait and our passport/suitcase project. I like to use this landscape collage as an introduction at the beginning of the year because so much can be packed into this lesson (painting, color mixing, texture, collage, landscape, etc). I used a similar collage landscape lesson with my second grade students for the Parisian Landscape Collage. And I also used this project last year for an Egyptian Landscape. It's one of those tried and true projects that I absolutely love.
 |
| I love how this artist positioned his Eiffel Tower in such a way that he seems to be gazing at it. |
Now, I've got my students for half an hour. By the time I'm done jibber-jabbering and they are settled down to work, they have around 15 minutes of work time. That's with 5 minutes at the end for clean up and The Smartest Artist if we are really lucky. So my lessons are in baby bites. Here's how I broke down the creating part of the lesson. After looking at many a sunset and other artists works, here's what we did:
- Day 1: Using a large vertical paper folded in half, students learn how to paint a tint of yellow (that's light yellow created with white and yellow) and a tint of orange (learning to mix the orange themselves.)
- Day 2: Create a tint of magenta and mix purple.
- Day 3: We chatted about clouds. If they are near the horizon, they are oh-so-small. Closer to the top of the paper, they increase in size. Many clouds have a flat bottom (which always gets a giggle) and a fluffy top. Texture is our word of the day.
- Day 4: Using a separate piece of paper that is about a third the size of our large sheet, we create a green tint and give it a texture.
- Day 5: Same as above, this time with blue paint.
- Day 6: Collage Time! We looked at a map of Paris and found that there is the River Seine runs right through it. So we glued our blue textured paper to the bottom. Then we tore our green papers in half. The kids then separated the green papers depending on how wide they wanted their rivers to be. Once decided, they glued the land down.

Once that was complete, we put our landscapes away for a bit to learn about hot air balloons. This book was a wonderful resource as it names and explains each part of the balloon.
 |
| When placing our hot air balloons on our paper, we chatted about drifting outside of the rectangle format of our paper. This little one looks like she's floating away. |

After reading about the balloons, we created out own:
- Day 7: Using either warm or cold color pieces of tissue paper, the kids used watered down Modge-Podge to cover a piece of paper that they had drawn a balloon shape on.
- Day 8: They cut out their balloons and used a sharpie to add lines that would help their balloon look more three-dimensional.
- Day 9: Photography Day! While the kids painted their hot air balloon baskets (which were toilet paper tubes cut in half) with vertical and horizontal lines, I took their photos. They stood in front of a large piece of blue butcher paper and put their hands over the back of a chair that had brown paper on it. I snapped two shots, one of the looking up and the other, looking down. We chatted about what they might see and that helped them become animated for their photos.
 |
| Sometimes we have early finishers. They usually meet on the floor to "play teacher" (where one student sits in my chair and quizzes the other students on a basket of three-dimensional shapes I have) or we read a book. This book was perfect. We found out that the first hot air balloon was launched in France! And that the first passengers were a rooster, a lamb and a duck. |

- Day 10: We glued down our hot air balloon, our basket and carefully cut out our photo.
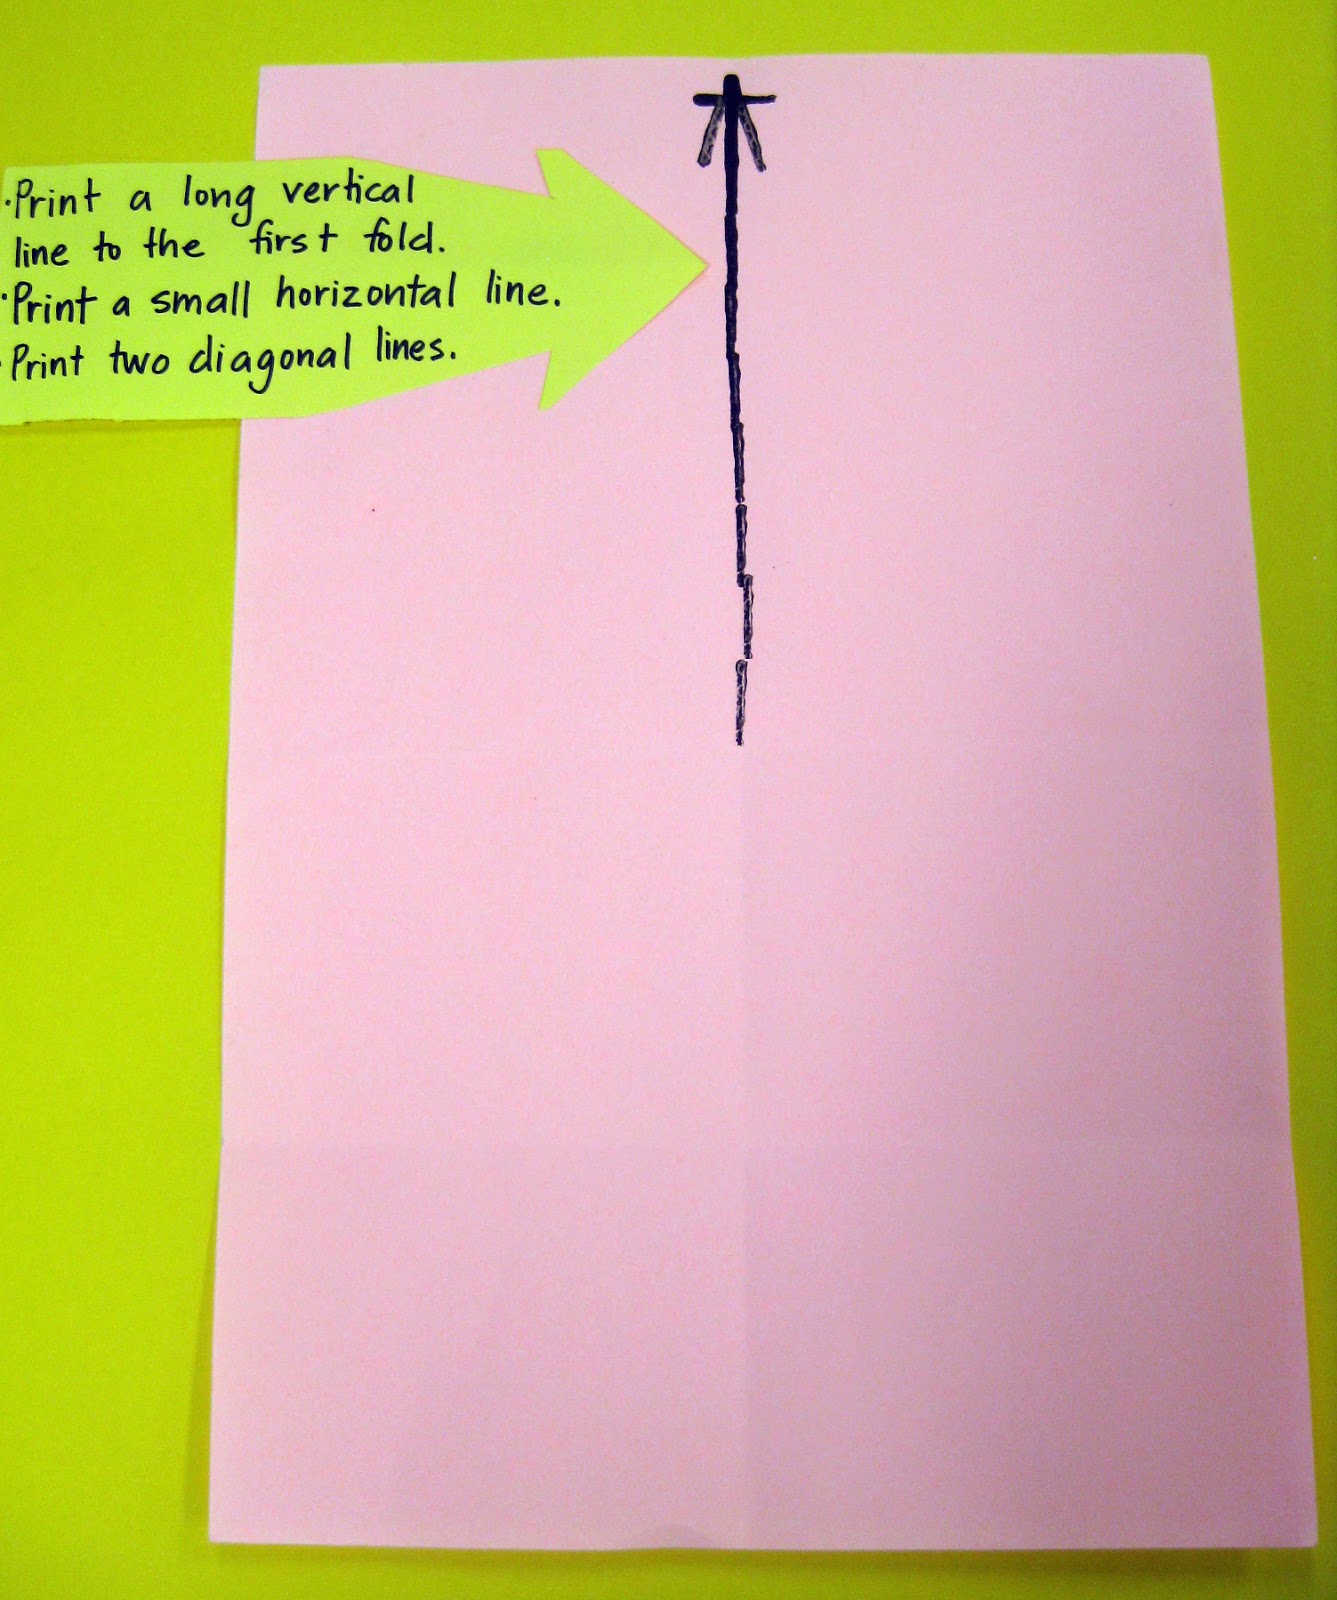
- Day 11: We chatted some more about the Eiffel Tower and it's history. We learned out to cut out a symmetrical tower and decorate it using the same lines that Gustave Eiffel used in his tower. I was determined that this would be our last day, so I may or may not have been late getting the kids to get those towers decorated and glued down.
 |
| Don't you just LOVE this?! I know I do! It was created by one of my practicum students to help support my lesson. The kids adore it, especially the fact that Jes made an appearance. |

Now, while I do love these, I am secretly dying for the kids to continue to add to the landscape. But did you see how many DAYS this took? Like, a million! So, I thought I'd ask your opinion (I have in the past and you guys always come through for me, thanks!)...what do you think? Collage some more or leave it be?
Regardless, I know that these artists couldn't be more pleased with their masterpieces. Thanks for reading!


